Sunday, May 4, 2014

Friendship 5 Series


Hi friends,
Geetha Achal and I have come with an interesting series idea.There are so many recipes, which, we would have thought to post in our blogs.But because of some reason, we would have not posted in our blog. This series challenge will help us to post those kind of recipes.This is going to happen first week of every month from monday to friday. We have compiled some interesting themes for the series. Have uploaded it in the file section in FB page.So for the first month (May) the theme is going to be "Home made powders" series.If you are interested,kindly reply and start posting the recipes on first week of every month.
Here are some kindly reminders.
* Link back to this page  and Geetha Achal Recipes page.
* Include this logo. This will spread the word.
* Both vegetarian and non vegetarian recipes are allowed.

If you have any suggestions and ideas,you can contact me any time.


Friday, May 2, 2014

Mango Shirkhand / Mango Flavoured yogurt - 400 th post - Step by step

  I am very happy to post my 400 th post, today. I started this blog to kill my time.  It has become one of my favourite hobbies now . Thank you every one, for your endless support. Though blogging is not so easy, we bloggers will never ever give up this passion. Every picture in the blog has its own stories or memories, which can be felt, when we see the picture after some time. We have experimented so many recipes again and agian, till we get the satisfaction to post it in the blog. With toddlers running around, every blogger faces the challenge of cooking,clicking and editing. I personally feel that ,blogging is about documenting the history and culture of our country. There are so many authentic recipes,which were forgotten now. So blogging is not just taking pictures, its a very good way to spread the culture and food of our country. 

    Today's recipe is very simple, but very nutritious . I have used hung curd to prepare shirkhand. But we can use greek yogurt too. It works fine. I got around 6 mangoes from "costco". They were not that sweet, so tried some recipes with it. Rohith, enjoyed the shirkhand . Shirkhand is so easy and simple, but what matters is its texture. The texture should be smooth and silky.You may be wondering, why I am posting simple recipe for my "400 th" post . According to me ,every recipe is special. Even a simple recipe should be presented and executed very well. Hence this recipe for my milestone. Check my other milestones here.
             50 th post  - Mutton Biriyani
                     150 th post   - Coconut Macroons
              300 th post - Chocolate Mousse


Setting time : 3 to 4 hours
Preparation time : 5 minutes
Chilling time : 30 minutes
Serving : 1

Ingredients:
1.Yogurt - 1 cup
2.Mango - 1/2 cup or as needed
3.Powdered sugar - 3 tbsp
4.Cardamom powder - a pinch

Method:
* Take yogurt in a clean white cloth and hang it on a tap. Keep a bowl , under the bundle, as the whey will be dripping from the bundle. Keep the yogurt in  this cloth, for atleast 4 hours or untill the yogurt become firm ,without any moisture. Keep the hung curd in the refrigerator immediately, as it may turn sour quickly. Instead of using hung curd, we can also use greek yogurt.
* Take the mango cubes in a blender, and puree it well. Make sure, we don't have any chunks in the puree.The amount of mango ,we put in the yogurt ,depends on our taste and the colour we need. If we want , a darker colour, add more mangoes.

The mangoes has to be first, peel,cubed and then pureed. Make sure you don't have any piece of the skin.


* Now take a bowl, add the hung curd,powdered sugar and cardamom powder. Mix them well. Adjust the amount of sugar according to your taste.If the mangoes are sweet, then reduce the amount of sugar. My mangoes are not sweeter, so I used 3 tbsp of powdered sugar.
* Now, add the pureed mango to the bowl . Whisk the mix using a hand whisk. We can also use a hand mixer to mix the shirkhand. The texture should be very smooth. So if you are not able to whisk the shirkhand without any lumps, pulse the mixture in the blender for some time. This will yield us a smooth shirkhand. But this is just optional.Serve it chilled.
Notes:
* Try to select ripe and sweet mangoes to prepare mango Shirkhand. This will reduce the amount of sugar to be added.
* The yogurt has to be fresh, if not it will give a sour taste to the dessert.
* Add very little cardamom powder to the dessert. Because it may over power the dessert.
*  Don't hang the yogurt for more time, if not it will become sour.
* Try to whisk the shirkhand using a hand whisk. If you cannot get a smooth shirkhand, then you can use a hand mixer or a blender.
* To get a dark yellow colur, just infuse few strands of saffron in milk and add it to the shirkhand.

Wednesday, April 30, 2014

Savoury Dampfnudel - Chicken stuffed buns

This month, the recipe is from the land of "Bavaria" cuisine. Saras gaves us a eggless sweet dampfnudel. It was quite attractive, I was about to plan for a dinner, so wanted to change it to a savoury version. Had some chicken ,so prepared a simple filling for the dampfnudel. Its almost like a chicken stuffed bun. It was so soft and great for a dinner. Loved the recipe. Will try the original sweet version. 


Ingredeints:
500 gram flour
40 grams sugar
6 gr salt
1 packet of dry yeast
100 gr butter
300 ml milk
1 tablespoon rum

For Milk Mixture:
300 ml milk
50 grams butter
A pinch of salt

For the filling:
1 lb Chicken
1/2 onion
1 green chillies
1/2 tsp ginger garlic paste
1 tsp of chilli powder
1/2 tsp turmeric powder
a pinch of garam masala.
2 tsp of oil
salt to taste
                                                                           
Method:
* Take chicken in a pressure cooker,with little ginger garlic paste and turmeric powder. Add 1/4 cup of water and cook it well. Once the whistle is released, take the chicken and shred it.Take a pan oil, saute the chopped onion ,green chillies and cook. Now add turmeric powder,chilli powder and garam masala. When the raw smell of the masala is released, add the cooked chicken and mix. Adjust salt to the filling. The filling should be dry. Keep this ready to be stuffed.

* Take a mixing bowl, add flour,sugar,salt yeast and mix well. Take another bowl, add butter and melt it. Now half way through melting, add milk and mix. Let the mxiture cool for some time.

* Pour the butter+ milk  to the dry mixture and knead it to a soft pilable dough. I used my stand mixer to knead the dough. The dough should pass window pane test. It means, when the dough is elongated, it should form a thin film of dough and then tear into a small hole, Now cover the bowl and proof it inside a lighted oven. This is the warm place for the yeast to work with the dough.After approximately 30 - 40 minutes, the dough would have doubled in size.
* Divide the dough into 6 equal sized balls. Now take the chicken stuffing and get ready to stuff them.
* Take one ball, flat it like a disc. Place a scoop of chicken filling inside the disc and close it, as shown in the picture.
* Similarly, stuff all the balls with the chicken filling. Seal the balls well, if not the filling will come out. Mix the nutter and milf under"Milk mixture" . The butter has to be melted ,cooled and then added to the milk. Pour ,half the milk mixture to the pan first. Take a iron pan, and place the chicken balls in. The seam side should be facing down. Now pour the remaining milk mixtrue on top of the iron skillet. Let it proof it again for 20 minutes or untill the balls are doubled in size.
* Pre heat the oven @350 degree farenhiet. Here the balls are doubled in its volume. Place the iron pan in the oven and bake the chicken balls for 30 minutes. Turn off the oven, and let the pan sit inside the oven for 20 minutes. Don't open the oven in between baking and cooling time, if not the balls will shrink in its size.

* Now place the iron skillet, on top of the stove and cook it covered for another 15 - 20 minutes, to get a crispy bottom. But make sure to check the pan, if not it will get burnt at the bottom. Cut the buns and serve .The buns were so soft. Don't keep it in the stove for so long, if not it will be burnt.


Notes:
* We can also stuff with vegetable or paneer filling.
* If we don't want a crispy bottom, we can just bake without cooking on the stove top,till it changes colour.
* Don't open the door of the oven, if not it will shrink in size. Let it sit for some time.
* Don't overcook the buns, if not it will become hard.

Linking this to "International Food Challenge" hosted by Saraswathi and Shobana 
.

Friday, April 25, 2014

Salem Fish Curry - சேலம் மீன் குழம்பு - A guest post from my friend " Geetha Achal"

        Today's Guest post is given ,by my friend and blogger " Geetha Achal" of "En Samayal Araiyil" . Our friendship started in 2010 and going strongly till now. We are blogger friends, but never met. We used to speak on phone for monthly once. It changed to weekly once and now it  is daily twice. Yes, as years passes, our friendship got thick. She become one of my family member .She is a very good human, who always gives feedback about my space and recipes.I always admire her stamina and courage. She is from Chennai too. Is that not enough for our bond ?
         She is one of the well known bloggers in "Tamil" language. Her blog is a interesting collection of recipes. Never seen these many biriyani varieties in any blog. I could say, she is "Biriyani Queen". If you give her some chicken, she will turn it into 100 different varieties. So energetic blogger,who will passionetly search for new ideas and recipes always. Happy to be her friend. Don't miss to check her space. This special fish curry is one of her speciality. This invloves grinding fresh masalas.This masalas gives a wonderfull flavour to the curry.Now back to her recipe.                              

                                     Salem Fish Curry !!!

Highlights of this Curry :
* In this curry,pepper ,cumin seeds,onion,tomato,garlic and coconut are roasted and then grinded to puree.
* While tempering, cumin seeds are added, this brings out a superb flavour to the curry.
* If you are using sambar powder, instead of  plain chilli powder, then no need to use coriander powder.


Cooking Time : 30 - 40 minutes
Serves : 4

Ingredients:
To Roast and Grind:
1.Pepper corns - 1 tsp
2.Cumin seeds  -  1 tsp
3.Pearl onions   -  10
4.Garlic pods    -  5
5.Tomato  - 1/2
6.Coconut pieces - 1 ( chopped)

Ingredients:
1. Fish - 1 lb
2.Pearl onion - 10
3.Garlic pods- 5
4.Tomato - 1/2
5.Curry leaves - few
6.Tamarind - small lemon size
7.Turmeric powder - 1/2 tsp
8.Chilli powder  - 1 tbsp
9.Coriander powder - 1 tbsp
10.Salt - as needed

To temper:
1.Oil - 2 tbsp
2.Mustard seeds - 1/4 tsp
3.Methi seeds - 1/4 tsp
4.Cumin seeds  - 1/4 tsp

To add at the end:
1.Oil - 1 tbsp
2.Methi seeds - 1/2 tsp


Method:
* Wash the fish slices separately . Chop garlic pods,onion, tomato. Take the ingredients" to roast" in a pan of little oil and saute it.Cool the ingredients and puree it in the blender to a fine paste.
* Dilute tamarind in 3 cups of water and extract the juice. Add the pureed masala to the tamarind water and mix it well.

* Take another pan, add oil and temper with mustard seeds,cumin seeds and methi seeds. Saute chopped pearl onuons,garli pods and curry leaves. Let the onion turn translucent.
* Add tomato and sprinkle little salt to it.When the tomatoes are cooked well, add the tamarind water and masala powders. Bring it to boil. Let the curry cook for atleast 10 minutes. This will remove the raw smell of the masala powder and tamarind.
* Mean while, roast the methi seeds in a pan. Powder it finely.Take a tablespoon of oil and heat it well.This oil has to be poured on top of the curry at the end.
* At last, add the washed fish to the curry cook it covered. Finally, add the powdered methi seeds along with heated oil.Turn off the stove. The curry will be in the hot stove for some time. This will bring out the flavours of the curry well.

Tasty Salem fish curry is ready. This will stay good for two days. Serve it with hot rice or idli , dosa.


Thursday, April 24, 2014

Sweet Corn Sandwich - Kid's healthy breakfast

     Its been raining for the past 2 days.The grass are turning green. I feel like being in India, during monsoon season. The urge of  having fried snack is increasing. I postpone the thought to certain extent. May be the urge will overcome me by this evening :) Took these pictures, during one of the cloudy days. Felt happy with the outcome. The antique wooden tray, I got in Home goods, gave a rustic effect to the picture.This is a healthy sandwich ,with all the goodness of cheese and corn. Its a breeze breakfast.


Preparation time : 5 minutes
Cooking time       : 5 minutes
Baking time         : 5 minutes
Yield                     : 2


Ingredients:
1.Bread slices -  2
2.Onion  -  1/2
3.Tomato-  1/4
4.Green chillies - 2
5.Corn kernels -  1/4 cup
6.Garam masala - a pinch
7.Parmesan - 1/4 cup
8.Cream or malai - 2 tbsp
9.Cilantro - few
10.Oil - 2 tbsp
11.Cumin seeds - 1/2 tsp
12.Salt - to taste
Method:
* Take a pan , add oil and splutter with cumin seeds. Add chopped onionn, slit green chillies .Saute it till the onion turns translucent.Now add cubed tomatoes and sprinkle little salt. The tomato should not be mushy, it should be cooked.

* Add the corn kernels to the pan. Mix it well.Blend the corn to the ,masala .At last add garam masala and salt. Now , we can add cream or malai to the pan. Turn off the stove immediately. Since ,I didn't have cream, just took malai from milk and added it to the pan. This gives a creamy texture to the mix.
* Toast the bread slices with little oil or butter on a pan. Scoop the masala and spread it on the toasted bread slices .Chop the cilantro and sprinkle it on the bread .
* Pre heat the oven @350 farenhiet. Spread shredded cheese on top of the bread. Place the bread slices on a baking pan, covered with aluminium foil.

* Toast the bread slices for about 5 minutes or till the cheese is melted. Serve immediately for break fast or snack.


Notes:
* We can also add some pepper powder to the masala. Adjust the spices according to your taste.
* Adding malai ,gives a creamy texture to the masala. If you don't have skip it.
* We can also add some other veges to the masala.
* Don't bake the bread for too long, then it will become crisp.
* We can also , grill the bread slices, by closing the sandwich.
* The masala should not be too mushy, then the bread will become soggy.

Tuesday, April 22, 2014

சத்து மாவு / How to make Ragi Malt powder at home / Sprouted grains porridge for kids

      Ragi malt is a  mixture of different grains, which are sprouted first, dried, roasted and then milled to a fine powder. This process may tend to be lengthy, but it is worth the pain. My mom is making this powder for the past 20 + years. Every time, she makes, I smell the same aroma and same taste. Nothing has changed, its her "Kai Pakkuvam", means her experience.We grew, drinking this drink and now our kids are drinking this tasty and healthy drink. Since, the grains are sprouted and powdered, it is very healthy. She used to dry them in our terrace, where we get lot of sunlight. This strict drying process, ensures us to have a clean and secure ragi malt ,which can be stored for months. 
       Whenever ,I go for vacation, I pack this wonderfull powder and use it   6 months - 1 year for  sure, here in US. When I went to vacation last year, clicked these pictures, while my mom was busy processing. Unfortunately, didn't take the pictures of the grains. Next time, when I go to India, will take complete pictures and update this space. I always see this ragi malt powder, which packed with nutrition and love from my mother. I always wonder about her hard work. When summer arrives, she will prepare vathal,vadagam,lemon pickles,tomato pickle, mango pickle and store it for the entire year. Everything ,from start to finish , within 2 months ( April - May). I am nothing ,compared to my mom. She does everything from scratch, no short cuts. I just documented this wonderfull recipe, for my future use or my next generation to adapt and follow. Since our ancestors ,didn't document so many rare recipes, we are left out with so many junk foods.This blog is a documentation of  "What I enjoyed eating" and "What, I enjoyed cooking". Hope this helps my next generation .


Ingredients


In Tamil 


Amount 

Ragi
Wheat
Green Gram
Roasted  gram
Pearl Millet
Millet
Peanuts
Rice
Almonds
Cashews
Cardamom pods
Sago

கேழ்வரகு
கோதுமை
பச்சை பயறு
பொட்டு கடலை
  கம்பு
சோளம்
வேர்க்கடலை
அரிசி
 பாதாம்
முந்திரி
ஏலக்காய்
ஜவ்வரிசி

1 Kg
1/2 Kg
1/4 Kg
1/4 Kg
1/4 Kg
1/4 Kg
1/4 Kg
1/4 Kg
100 gm
100 gm
25 gm
100 gm 

Method:
* Start the preparation in the morning of Day 1. Wash ragi,wheat,green gram,millet and pearl millet well. Soak these grains in water in separate bowls. 
* At the end of the day (night), take the grains out of water and tie them separately in clean wet towels .The wet towels help, the grains to sprout. Tie the towels using separate threads and hang them . This will make the excess water to drain from the towel. 
* When we open the towel in the morning of day 2, the grains would have sprouted well. Take them out and dry them on clean towels in open space . The grains should be dry . During summer, the grains will dry quickly .
*  Now start roasting the sprouted grains one  by one. Dry roast the rice,roasted gram,almonds,cashews,sago ,peanuts separately.
* Combine all the grains and nuts . Let them cool completely. The grains should not be hot, while grinding.Powder them well in a Flour Mill. Let the powdered ragi malt, cool completely. Store them in air tight containers.

Notes:
* The sprouted grains should be dry ,while roasting it. If not it will not stay fresh for longer time. Always dry them in hot and dry place , under direct sunlight.
* We can add some pistachios also, its optional.
* Cardamom pods has to be added very less, as it has strong flavour.
* Ragi malt powder has to be stored in clean containers, if not bugs will infest them.
* Don't skip the sprouting process, as it increases the nutritious values of the powder.
* We can also try to powder them using mixie, but it may not pulse it well.

                                                     To make Ragi malt for kids !!!


Ingredients:
1.Ragi malt powder          -        2 tsp
2.Milk                              -        1/2 cup
3.Water                            -        1 cup or as needed
4.Sugar                             -         1 tsp
5.Salt                                -         a pinch

Method:
* Take a bowl, add ragi malt powder and water. Let the ragi malt powder combine well with the water .We can alter the consistancy ,by adding more or less water. Cook the mixture in medium heat , mixing them in between.
* When the ragi malt is cooked well, it thickens. Turn off the stove ,add milk, sugar and salt.
* Serve these healthy ragi malt for all ages. 
* We can also skip sugar and serve these for adults too. A power packed breakfast for all.


Linking this to "Tamizhar Samayal Tuesday" started by "Nalini Suresh"

Thursday, April 17, 2014

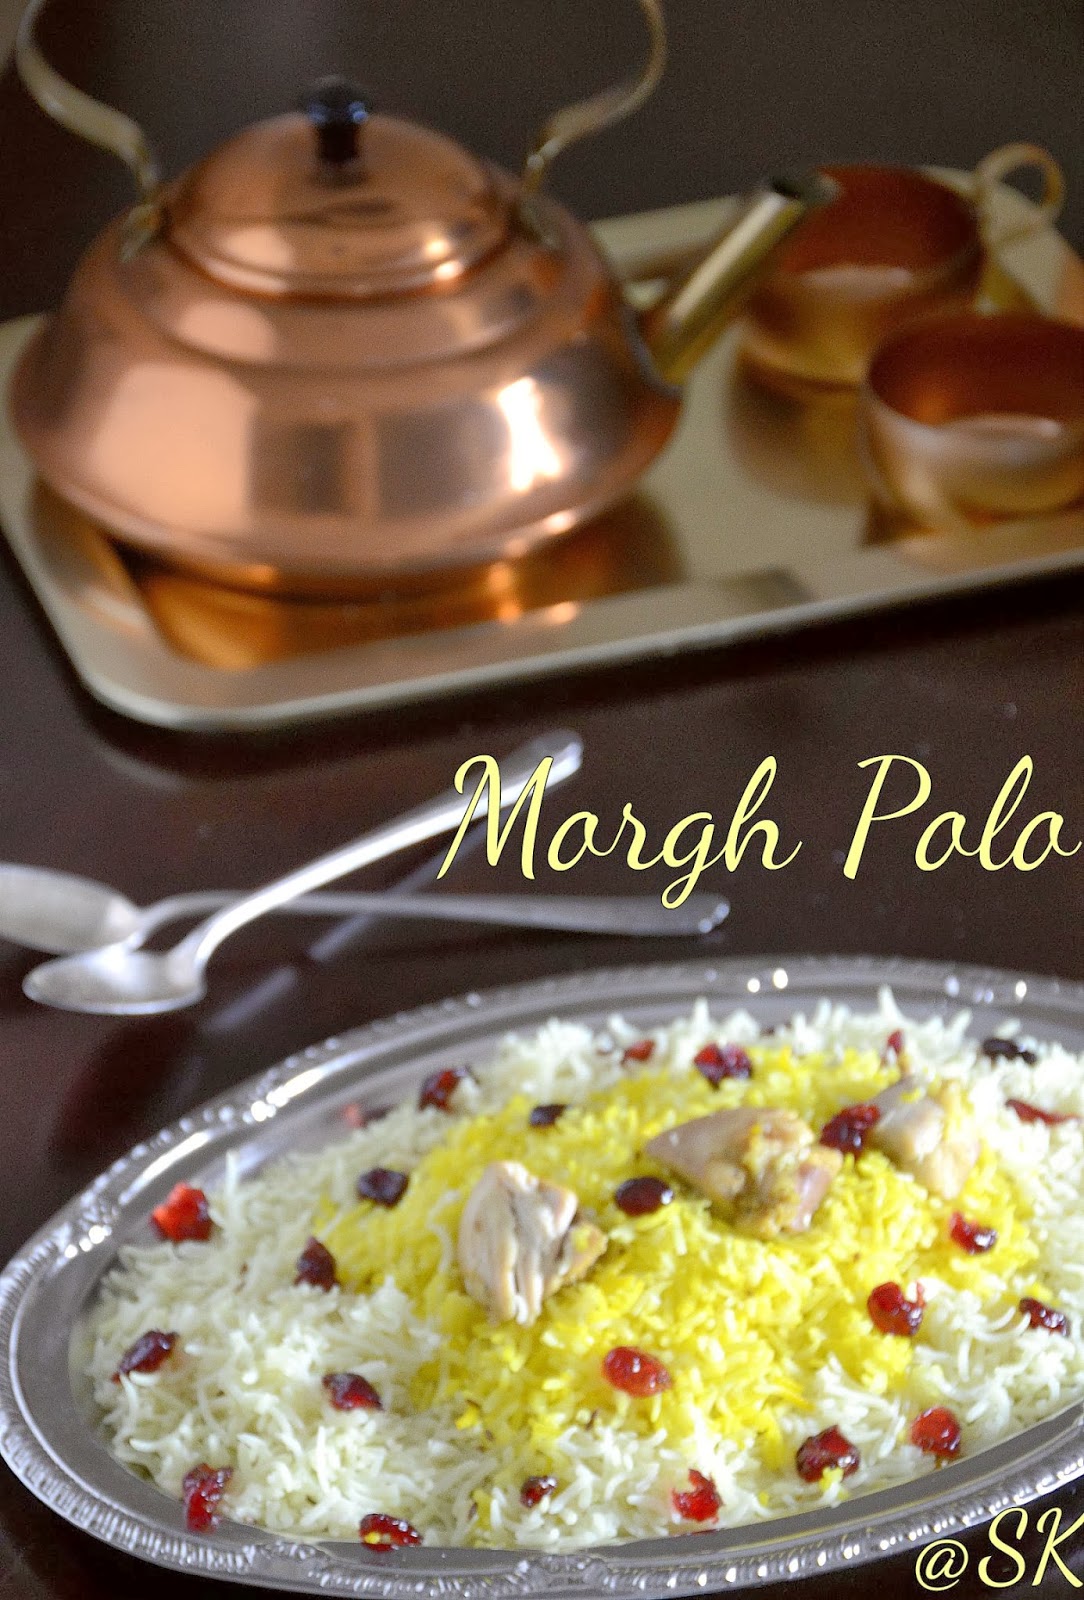
Morgh Zereshk Polo - Barberry Chicken Rice - Persian Cuisine.

Morgh Polo is a traditional rice of Persian Cuisne. Here the  Zeresh or the bar berries are widely used in thier cuisine. Its a sweet and savoury rice. The berries contribute the sweetness. The rice is flavoured by saffron. Saffron and turmeric are two main spices of Persian cuisine. Bar berries are available in persian super markets.I couldn't find those, so replaced it with dried cranberries. We can also use pomegranate seeds to this rice.

Recipe : http://www.persian-recipes.com/persianrecipes/2010/03/16/morgh-polo-chicken-rice/
Ingredients:
500 grams Chicken –you can lesson the amount of chicken if you wish
1 small onion - finely chopped up
100 grams barberries (zereshk) or dried cranberries or pomegranate seeds
3-4 cups rice
1-2 teaspoon zireh (cumin)
1 teaspoon liquid saffron
oil
2-3 tablespoons sugar
salt/pepper
turmeric

 
Method:
* Wash and soak the basmati rice with little salt for about 1/2 an hour.  Wash and clean the chicken well. Take a pan,heat oil, add chopped onion and garlic pods. When they give out nice aroma, add the chicken pieces.Add some turmeric powder, salt and pepper now.  Saute the chicken, for a while and add enough water . Cook the chicken ,covered for about 15 - 20 minutes in low flame or until the chicken is juicy and moist.
 
* Once the chicken is cooked , strain the water and reserve it for cooking the rice. Take a pot, add the chicken broth and bring it to boil. Now add the soaked basmati rice to the pot. If the broth is not enough, add some more water, so that the rice has enough water to cook. Rice has to cook just 50 %.

 
* Strain the rice using a colander. Wash it once, by running under a cold water pipe. This will stop the cooking process of the rice ,also ,it helps the rice to remain non sticky. Now take a pan, layer the chicken pieces. 

 * Spread the half cooked rice on top. Sprinkle some cumin seeds on top of the rice. Some people love to use some bay leaf to the rice, which will give a very good aroma to the rice.Add very little oil and salt at this point.Close the pan with a hand towel and cook on low flame for about 15 minutes or until the rice is cooked.
 * Mean while, we will prepare the zereshk or dried cranberries,when we are ready to serve the rice.. Wash the dried cranberries and soak for   15 minutes. Take a pan, add little oil, sauté the cranberries and add sugar to it. Let it get blended well. Turn off the stove and add saffron . While serving, take half of the rice and mix with cranberries . Serve the plain rice and then top it with the cranberry rice.
Serve the ricw with any spicy chicken curry . As this rice is milder in taste, goes very well with any spicy curry. 


Notes:
* If we don't have liquid saffron, we can use saffron strands. Just dissolve it in warm milk for 10 minutes.
* Barberries are found in Iraninan shops. If you don't get ,then replace it with any kind of dried fruits.
* The rice has mild flavor, which is equallent to jeera rice.
* I have given the authentic version. You can substitute with the spices of your taste.
* Instead of cooking the rice in chicken broth, we can cook in normal water.This way the rice doesn't have light yellow colour.

You might also like

Related Posts Plugin for WordPress, Blogger...