Friday, June 6, 2014

Restaurant Style Onion rings - Friendship 5 Series - Step by step

In the "Fast food - Kids friendly " series. onion rings play a big role. I tried onion ring
s with red oinons, but satisfaction was met using white onions. White onions has that perfect texture, it glides in mouth ,when we prepare onion rings.Previously, I prepared onion rings, without eggs. But  it didn't coat the onions well. So the next time, I used egg,it coated onion very well. To my surprise, onion rings came out too good. From then I decided not buy onion rings from shop.  Its too good and easy to prepare at home. We can also bake the onion rings in oven. But will you ?


.
Ingredients:
1.Yogurt - 1/2 cup
2.Water  - 1/4 cup
3.All purpose flour - 1/2 cup
4.Baking powder - 1/4 tsp
5 Chilli powder - a pinch (optional)
6.Salt - as needed
7.Pepper powder - 1/4 tsp
8.Egg - 1
9.Bread crumbs - 1/2 cup
10.White onion - 1

Method:
* White onion is very  apt for onion rings.I have tried onion rings with red onion,it did not taste like the restaurant.So always use white onions to get a restairant style onion rings.Take white onion, peel the skin and slice it into 1/4 inch thickness, as shown in the picture.Take all purpose flour and baking powder in a plate. Mix them well,for the baking powder to combine with the flour.Dust the onions in the flour mixture and arrange them on a wire rack.Baking powder, gives a flaky texture to the rings.
 
* Take a bowl, add the flour mixture ,which is remaining after flouring the rings. Add beaten yogurt,egg,water, chilli powder,salt and pepper powder. Form a smooth paste out of it. Eggs acts as a binding agent, so don't skip it. Its the reason, we get a thick crust on the onion.I tried to skip the egg once, but it resulted in a thin coated onion rings.So egg is must.Sorry Vegarian friends :(
* Take the batter in a bowl. Dip the floured oninon rings into  the batter. Coat them well using a spoon. Let the excess batter drip , by keeping them on a wire rack.Leave it for while.
* Now coat the banttered onion rings with bread crumbs.Again let  them set on a wire rack.Mean   while, heat a pan of oil.
* Fry the onions in medium hot oil. Flip them around to get a golden brown onion ring.Strain the onion rings on a plate covered with paper towel.Serve it with ketchup or mayonnise.See who is stealing a onion ring. Yes. Its Ashwath. Ashwath and me gobbled the whole plate within minutes :)

Notes:
* For a perfect onion ring, use white onions .
* Baking powder gives a flaky texture to the onino rings, so don't skip it.
* Fry the onions in medium hot oil, if not the rings will burn quickly.
* We can also add some salt and pepper powder to the bread crumbs to give a punch.


Linking this to "Friendship 5 Series" started by Geetha achal and Savitha Ramesh


Thursday, June 5, 2014

Chocolate Milk - Prepared using home made chocolate syrup - DIY Chocolate syrup recipe - Step by step

     The next entry to the "Kids special - fast food " series, here comes the ultiemate favourite of kids "Chocolate milk". Whenever , Rohith gets food from cafeteria, his lunch will always accompany chocolate  milk. It become a part of his life now.We usually buy "Hersheys " chocolate syrup.One day , I wanted to prepare at home for a change. When I searched the internet, got this recipe. It was a easy recipe with less ingredients. Immediately tried the recipe, it came out successfully.
 
     Chocolate syrup can be easily made  at home using the below recipe. It is so easy to make ,with simple ingredients. The difference between home made chocolate syrup and the store bought can be checked at the back of the store bought bottle. There are numerous artificial ingredients added to the syrup.When we taste the store bought ones. there will be a bitterness at the end, that is because of the preservative added to the syrup.So always use home made products to kids.


Source: Foodnetwork
Ingredients:
1.Sugar - 1 cup
2.Water - 3/4 cup
3.Cocoa powder - 3/4 cup
4.Salt - a fat pinch
5.Vanilla - 1/4 tsp


Method:
* Keep the water,sugar ,cocoa powder and vanilla essence ready near you.


* Take sugar and water in a bowl.Heat the bowl, till the sugar is melted. There is no need for us to take any string. Let the sugar melt in the water - its that simple.

*Sieve the cocoa powder well. Add the cocoa powder directly to the bowl. Turn the flame to low and keep stirring. Cocoa powder would have melted to the sugar syrup.Add salt to it now.
* Keep the syrup stirring till you see a glossy syrup . We can check the consistancy of the syrup by dipping a spoon. If the syrup coats the back of the spoon, then we have reached the right consistancy.Turn off the syrup and add vanilla to it and mix.Cool the syrup and store in a air tight container or a bottle.Refrigerate it.

* Whenever we need to make the chocolate milk, just heat the milk, add little syrup to it and mix. Your chocolate milk is ready in minutes. Or just pour this syrup on top of ice cream, mousse or any dessert.


Notes:
* This syrup stays fresh for almost a month, when refrigerated.
* The syrup has to be bit runny, because refrigeration can make the syrup thick.
* We can make cold coffee, frappuchino the imagination is endless using this.
* If you want to alter the sweetness, we can do it by increasing or decreasing the sugar.
 

Linking this to "Friendship 5 Series" started by "Geethaa  Achal" and "Savitha Ramesh"

Wednesday, June 4, 2014

French Fries - Step by step - Friendship 5 Series

           Next in the "Kid's special - Fast food" theme, french fries hits the first place. Whenever we go out, there are two thing we buy for kids. They are chicken nuggets and french fries. Rohith and Ashwath will happily munch on these.French fries were in my to do list for almost 6 years. Yeah you are reading it right. When I started cooking, this was in my list always.Some how, I skipped the deep frying process for long. But after preparing this , I some how reduced the avertion towards frying. Kids enjoy the most. So I have no other option.

Ingredients:
1.Potato - 2 (big)
2.Oil - for frying
3.Salt - to taste
4.Pepper powder - to taste

Method:
* Wash and peel the potatoes. Cut them into strips as shown in the picture. Leave the potato strips in the water for atleast 3 hours or over night.This step is very essential in getting a crispy french fries and avoid the fries to become soggy. This will remove the starch from the potatoes.Strain the potatoe strips and pat it dry on paper towels.
* Let  the potato strips stay in the paper towel, till it looses all its moisture.Mean while, heat a heavy bottomed - wide pan with 2 inch of oil. Heat till it is medium hot. Approximately 300 degrees Farenhiet.Drop the potato strips in small batches. Fry them , till they are half cooked. Remove them and keep it on a paper towel.
* Continue this process for the rest of the potatoes.Now trun the flame to medium high or 400 degree farenhiet approximately. Fry the potatoes in two batches ,till they turn golden brown. Strain them again on a paper towel.Season it with salt and pepper powder. Serve them hot.

Note:
* I have used rousset potato, you can use any potato, good for chips.
* Don't cut the potatoes thinly, then the fries will become crisp.
* While frying, make sure that the potatoes doesn't have any moisture,while frying.
* Don't fry the potatoes so much, then it will become crisps.
* Always remove the starch from the potatoes. This is an essential step in getting a crispy french fry.


Linking this to "Friendship 5 Series" started by "Geethaa  Achal" and "Savitha Ramesh"

Tuesday, June 3, 2014

Chicken Nuggets - Friendship 5 Series

      Mc Donald's  chicken nuggets is a favourite among our kids.At first, when I tasted I didn't like it. As it was bland in taste .But as time passes, we got used to its taste.We call it as "chicken bajji". When I tried at home , it came out well. The secret lies in tenderizing it. Tenderizing is a process of breaking down the tissues. This will yield a soft nuggets. So don' t try to skip the tenderizing part. Otherwise this recipe is simple to make.
                        
Ingrediens:
1.Boneless Chicken - 1 lb
2.Egg - 1
3.Flour - 1/2 cup
4.Bread crumbs - 1/2 cup
5.Salt - to taste
6.Pepper powder - to taste.
7.Oil - for frying

Method:
* Wash and clean the chicken well. Take the chicken and tenderize it by patting the chicken .This step is necessary to break the ligments. If not the chicken will turn hard. Grind  the tenderized chicken in a blender to smooth .
* Take a bowl, add mashed chicken, salt and pepper. Mix it well.Divide them into small balls. Smooth the rolled balls and slightly press them to form patties.Arrange them on a plate.
                        
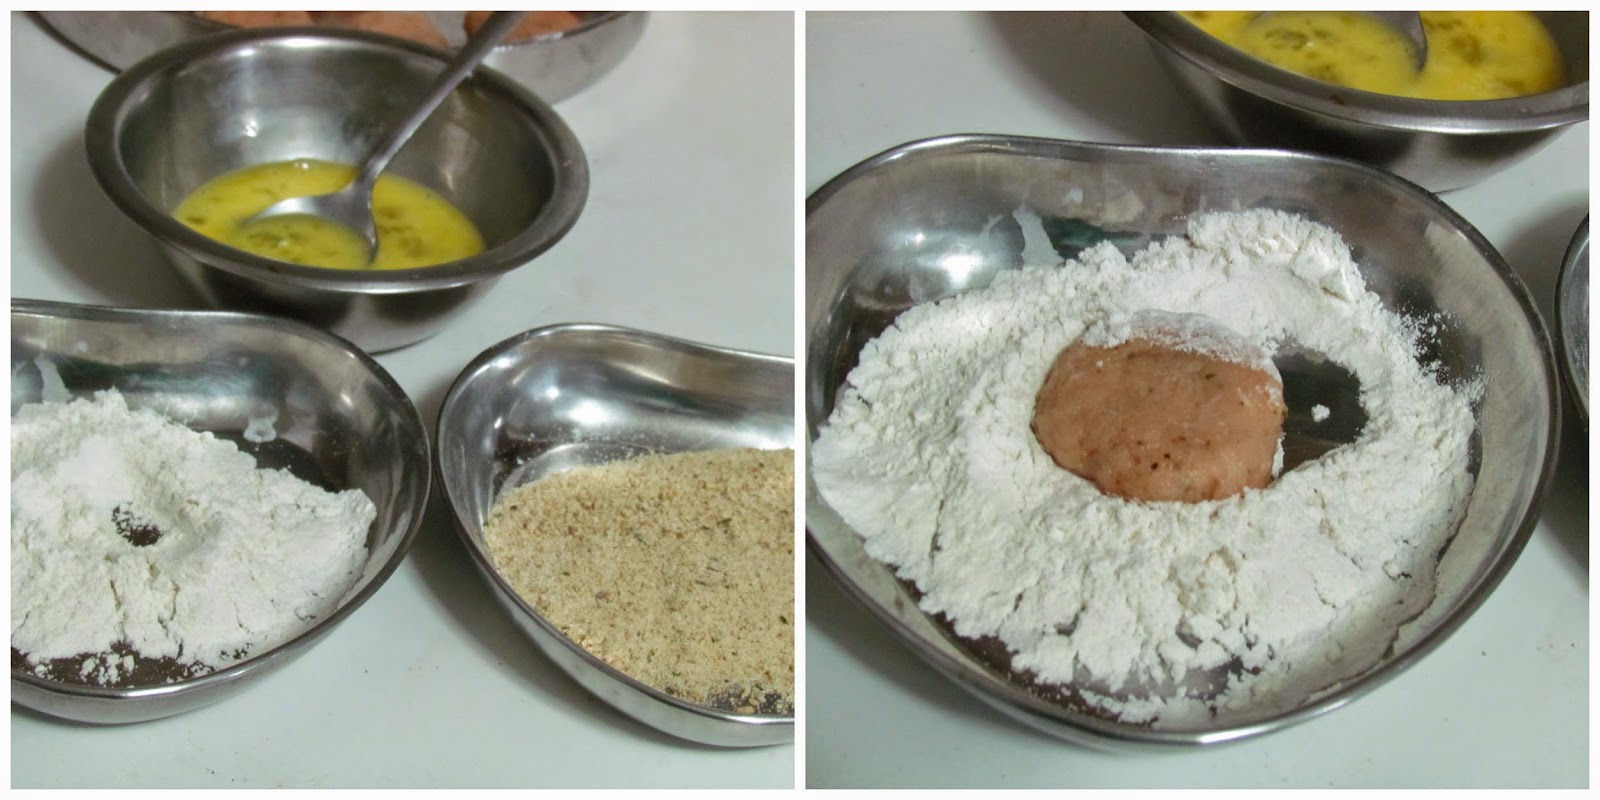
* Beat the egg in a bowl.Add little salt to it. Take flour and bread  crumbs in separate plates.First dust the nuggets in flour.
* Dip it in the egg bowl and coat it in the bread crumbs.
* Once they are well coated ,let them be arranged on a wire rack. Leave it for about 10 minutes. Heat a pan of oil.When the oil is medium hot, drop the chicken nuggets into it.Cook till the nuggets turn golden brown.
* Strain the nuggets on paper towel, let the excess oil come out of the nuggets. Serve with ketchup and ranch.

Notes:
* Tenderizing the chicken is a must, if not chicken will turn hard.
* Adjust the salt and pepper to your taste.
* Don't cook the chicken nuggets in very hot oil, if not the chicken will turn black soon,and the inner portion will be uncooked.
* If possible , season everything, like flour, bread crumbs and egg with required amount of salt and pepper.
* If you don't like the smell of egg, then replace it with maida batter. Just mix maida with little water . Mix it to form a paste.
* We can also soak the chicken in buttermilk to be juicy.

Linking this to "Friendship 5 Series" started by "Geethaa  Achal" and "Savitha Ramesh"


Monday, June 2, 2014

Doughnuts - Krispy Kreme Style - Best home made doughnuts - Step by step

   This month we are running a series on "Kids favourite - Fast food " theme.When I think of fast food, doughnuts came to my mind ,as we always buy doughnuts for Rohith, from Krispy Kreme.
Doughnuts are my son's favourite. He loves the Kris kreme doughnuts to the core. When I was searching for the recipe, this website caught my eyes. The steps were so easy and there were so many reviews about the doughnuts. So many people has tried the doughnuts and posted thier pictures. These urged me to prepre the doughnuts immediately. 
     I quartered the recipe, as it will be too much for my family. I also made small doughnuts , so that it ill be easy for my kids. We fell to this recipe completely. I made batches and batches. Tried some plain glaze and chocolate glaze. Bothe were very good. Doughnuts taste too good, when thery are warm.So whenever needed, pop them in the mmicrowave for 10 - 2 0seconds and your doughnuts are ready. 

Source: Instructables
Preparation time : 10 minutes
Proofing time : 1 hr and 30 minutes
Cooking time : 20 minutes
Yield : 20 doughnuts

Ingredients:
1.Flour - 1 3/4 cup + 2 tbsp
2.Egg - 1
3.Sugar - 3 tbp
4.Water - 2 tbsp
5.Yeast - 1 tsp (5 gm)
6.Milk - 1/2 cup + 1 tbsp
7.Butter - 2 tbsp ( at room temperature)
8.Salt - a pinch
9.Sprinkles - 1/4 cup (optional )

For the chocolate glaze :
1.Chocolates - 1/2 cup
2.Buttrer - 2 tbsp
3.Corn syrup - 1 tbsp

For the sugar glaze:
1.Confectioner sugar - 1 1/2 cup
2.Water or milk - 3 to 4 tbsp
3.Vanilla extract - 2 tsp

Method:
* Take flour,sugar,salt,crumbled butter and beaten egg in a mixing bowl. If you are using rapid rise yeast, then just add it to the bowl. If you are using dry instant yeast, then dissolve it in a cup of warm water. When the yeast foams up, add it to the bowl.Heat the milk in microwave or on a stove top for 30 seconds. This is called scalding. It destroys the bacteria ,which hinders the proofing process. Cool the milk, till it is warm.Now  add it to the bowl and knead. The dough should be soft .If it is sticky, no issues.
* Transfer the dough to another greased bowl.Cover the container and keep it in a warm place. The dough will double in its volume.It took me around 1 hour for the dough to get double.
* Punch down the air from the dough.Dust the work space with flour. Roll the proofed dough into 1/2 inch thick,using a rolling pin.Use round cutters and cut the dough into doughnuts. Take another cutter, smaller than the first one and make holes in the middle. The cutters should be floured to prevent them from sticking with the dough.

* Take a tray, arrange the doughnuts and proof it again for atleast 30 minutes. After 30 - 40  minutes, the doughnuts, would have risen as shown in the picture.Heat. a wide pan with 2 inch of  oil. The oil should not be too hot, then the doughnuts will become black and under cooked. The oil should be medium hot.Drop the dounuts in batches into the oil . The dounghnuts will cook and rise in its shape.Flip it over and cook till they are golden brown.
* Mean while prepare the glaze. Take chocolate,butter in a microwave and melt it for 30 seconds.The butter and chocolates should have combined .At last add corn syrup to the chocolate.This will give a glossy finish to the doughnuts.Similarly for the sugar glaze, just combine confectioner sugar,milk and vanilla. The glaze should be too thick.

* Strain the cooked doughnuts on a paper towel.Let it shed out excess oil.Now when the douhgnuts are still warm, sip in the glazes and keep them on a tray.Sprinkle some confetti and serve.
Verdict :
I will never ever buy doughnuts from shop !!!.This  was a fool proof recipe. It was too good to eat  it with the glaze.As you can see, the doughnuts were so fluffy and soft.
Notes:
* Don't add hot milk to the flour, then the yeast will die.
* Proofing has to be done in a warm place.I kept it in my oven ,with just the light on.
* Don't roll the dough too thin, then the doughnuts will become crisp.
* Don't cook the doughnuts in hot oil, then the inner will be raw and the outer part would have become black.
* The original recipe called for shortening, which I replaced with butter. ,
* We can also refrigerate the doughnuts and thaw them to room temperature, when we are about to fry. This is apt, when we prepare the doughnuts in the night and refrigerate.Take them out, bring it out and fry.But I prepared them and fried them the same day.
* If the work area is not floured properly, then the dough will stick to the surface and you will not get a properly shaped doughnuts.


Linking this to "Friendship 5 Series" started by "Geetha Achal" and Savitha Ramesh.


Tuesday, May 27, 2014

Easy Tomato Thokku / தக்காளி தொக்கு - Travel special tomato preserve for idli,dosai and chapathi - Step by step

        Tomato thokku or preserve is similar to a pickle,where in pickle making, we sun dry the tomatoes.But in making preserve, we don't dry the tomatoes. I tasted this thokku at my In-law 's place for the first time. It tasted too good.So when my MIL came to Dallas, asked her to prepare the thokku and took pictures. Unfortunately, missed the final picture. After that, I have prepared this thokku several time, but didn't took pictures. So when we planned our "Chicago" trip, this weekend, I know ,what I am going to make. Yes, my MIL's special tomato preserve. The reason, is this thokku stays fresh for atleast a week. We took some idlies,and rotis. It tasted heavenly ,with idlies and dosais. This is a fool proof recipe, I would say and also my Family's traditional recipe.
          

         Actually, on the final day, we were having this thokku in our car and travelling the whole day, without refrigerating. To our surprise, this thokku stayed fresh, even after, keeping it in the car. The reason is, sesame oil.It keeps the thokku fresh. Also, it should be kept in a clean container. You can prepare this thokku in bulk and use it whenever needed.My friend, who came with us ,for the trip, enjoyed the preserve very well. She insisted me to post the recipe.Hence the recipe today.Prepare this easy tomato thokku and enjoy.

Preparation time : 15 minutes
Cooking Time : 1 hour (approx)
Yield : 1 kg (approx)

Ingredients:
1.Tomatoes - 10 (big) about 4 kg
2.Ginger - 1 inch
3.Garlic pods - 4 to 5
4.Cinnamon sticks - 2
5.Fennel seeds - 1/2 tsp
6.Chilli powder - 1 tbsp
7.Salt - to taste
8. Cooking oil + Sesame oil - 1 cup


Method:
 *  The more the tomatoes are juicier, the time to cook  , increases . So select tomatoes according to the time, you have in hand. Wash the tomato and pat it dry. Cube the tomatoes .Take a blender , add ginger,garlic pods,cinnaman sticks and fennel seeds. Grind them into a fine paste.Don't add water while grinding.
* Take a wide pan. It should be heavy bottomed. Add 3/4 cup of the oil  and heat it.Now add tomatoe cubes. Let it cook in medium flame.Sprinkle little salt, for the tomatoes to cook fast.

* After 15 minutes, the tomatoes would have been mashed well.Now add the grinded ginger garlic paste to the pan.Cook it till the raw smell dissappears.Mean while, add oil little by little.
* After half an hour, the tomato would have been cooked well. at this point, add the chilli powder. We can either use plain chilli powder or sambar powder. If we use plain chilli powder, we will get a bright red colour thokku.I mixed both chilli powder and sambar powder.It tasted good.
 
* Once, the raw smell of the chilli powder vanishes, turn the flame to low. Add the remaining oil to the pan.Thokku will start to shrink in its volume and oozes out oil.Adjust salt to taste. By now the tomato thokku would have shrink to 1/4 of its initial volume.Turn the stove off. Let the thokku cool completely.Store in air tight - sterlized containers.Serve for idli,dosai and chapathi. Even curd rice  goes very well.


Notes:
* Always dry the tomatoes,before cooking it.
* Sesame oil will make the thokku to stay fresh for atleast 10 days ,in the refrigerator,
* We can also saute the ginger garlic paste first and then add the tomatoes. But make sure you don't burn the paste.Because, burnt ginger garlic paste,will give slight bitterness to the thokku.
* Always use clean container to store the thokku, if not it will spoiled soon.Store the thokku in refrigerator .It stays good for atleast a week in refrigerator.
* Always use a clean spoon, whenever you take the thokku.
* Don't add more ginger and garlic, then the thokku will have a strong flvour from the garlic.

You might also like

Related Posts Plugin for WordPress, Blogger...