Monday, October 6, 2014

Easy Coconut Burfi - தேங்காய் பர்பி - Diwali Special -Step by step

       Diwali is a festival of lights. We normally celebrate it by lighting crackers,sharing sweets and worshipping at home. We observe a fast called "Nonbu" on the "No- moon day", which is normally comes after diwali. I have shared so many sweet recipes ,not many savouries. Yes, I have a big sweet tooth. Today I am sharing, one of my MIL's recipe of "Coconut burfi". I used to make burfi, by taking sugar syrup. But if the sugar syrup is not properly taken, then the burfi can go wrong. My Mil taught me this easy recipe, where we mix everything and cook, till the burfi becomes a mass and leaves out of the sides of the pan. Is that cool, to make a burfi, without any hassle ?. Then try this recipe , and you will make it again and again.

    From today ,we are going to post recipes under the theme " Diwali " for "Friendship Series". So check this space for traditional and easy diwali recipes.


Preparation time : 15minutes
Cooking time : 15 minutes
Yield : 16

Ingredients:
1.Shredded coconut - 1 cup
2.Sugar - 1/2 cup 
3.Milk - 1/4 cup
4.Cardamom powder - a pinch
5.Ghee - 3 tbsp
6.Saffron strands -for garnishing


Method:

* We can either use frozen coconut. Here , I have used fresh coconut . I have taken 1/2 cup of sugar for 1 cup of coconut. We can also increase, if we want it more sweet. I have used 1/4 cup of milk. Don't increase the amount of milk, if not the burfi will become chewy. I have used 2 tbsp of ghee, to give a good flavour to the burfi. Grease a square pan with little ghee and keep it ready.
* Take a pan, mix coconut ,sugar and milk together. Mix  them using a laddle ,without any lumps. Keep the pan on flame and start mixing. If you don't have milk, we can also substitue with water. but not more than 1/4 cup.
* The mixture will start loosing its moisture . Just mix it using a laddle. When the mixture becomes thick, add ghee and cardamom powder. Having a heavy bottomed pan, will work good .
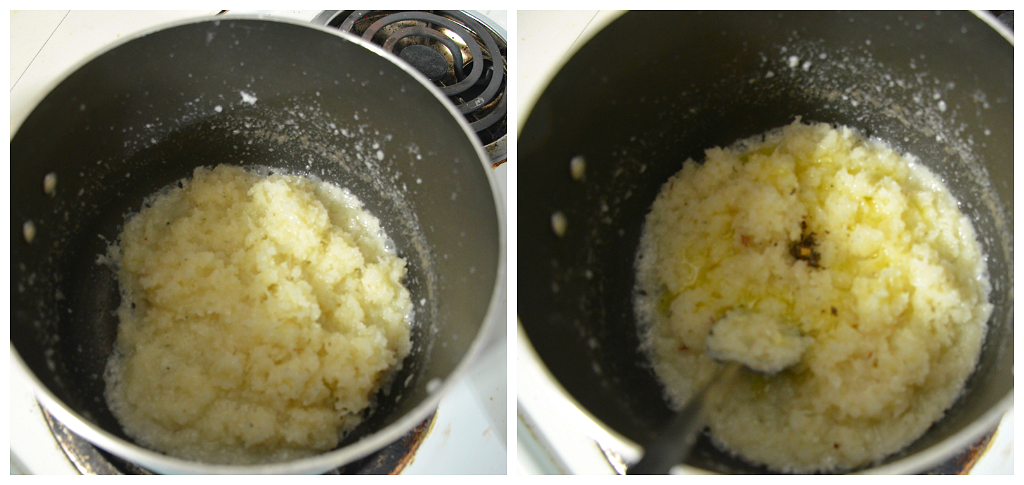
* After 10 to 15 minutes, the mixture would have gathered like this in the picture. It would have started leaving out of the pan too. Now its the right time to transfer this to a plate. Spread the mixture to the greased plate. When it is still warm ,mark lines for us to cut , using a knife.

* When the burfi, becomes hard, cut them in slices . When they are cool, store them in air tight container.


Notes:
* Always use fresh coconut, to have the best burfi. We can also use dry coconut, this will have less moisture.
* We can increase the sugar to 3/4 cup instead of 1/2 cup.
* Using ghee will give a nice flavour to the burfi.
* We can also add a pinch of yellow food colour to the burfi.
* Burfi has less shelf life, as we have used milk and coconut. We can store the burfi in refrigerator for upto a week.

Linking this to "Friendship 5 Series ", started by "Savitha Ramesh" and "Geetha Achal"


Tuesday, September 30, 2014

Masala Sundal - மசாலா சுண்டல் - Navarathri Special - Step by step

      Sundal is an important prashad, which prepared during Navathri. I have gone to golu, where different kind of sundals will be prepared every day. Today . I am going to give you the recipe, which my MIL used to prepare . It is quite different from all. Here , coconut ,ginger and green chillies are grinded to gether and added to the tempering. The addition of ginger to the tempering will give out a very good smell to the sundal. To make it even more healthier, we can sprout the grains and cook .Try this simple sundal and celebrate "Navarathri".

Check my other sundal recipes 


Preparation time : 10 minutes
Cooking time : 15 minutes
Serves : 4

Ingredients:
1.Chick peas - 2 cups
2.Grated coconut - 1/2 cup
3.Green chillies - 3
4.Ginger - 1/2 inch 
5.Salt - as needed

For tempering:
1.Oil - 1 tsp
2.Mustard seeds - 1/2 tsp
3.Urad dal - 1/2 tsp
4.Hing - a pinch
5.Curry leaves - few
Method :

* If you have time, soak the chana or chick pea for an hour. I did'nt have time, so I went ahead and soaked the chana in hot water for 10 minutes and cooked , it for 3 whistles or untill it is cooked well. Reserve the water from cooking the chana. Use it to make dal,or any kind of dish in your cooking.We can also cook the chana in batches and freeze them. Whenever, we need, it ,just thaw it and use .


* Take a mortar and pestel ,and crush the ginger with green chillies. We can also, crush them in the blender.


* Take the grated coconut in a jar and pulse it well with the crushed ginger and green chillies. We can also add chopped cilantro , to give a greener touch to the sundal.

* Take a pan, add oil and temper with all the ingredients, given under tempering. Hing is optional, but it gives out nice aroma. Once the mustard seeds are crackled, add the coconut- green chilly mixture and toast them. Don't saute them, just toss them to remove the raw smell. Add salt to taste.

* Now mix the cooked chana to the pan and give it a mix. Garnish with cilantro.


                                                                                 Serve the sundal along with tea.


Notes:
* We can also use red chillies to temper.
* This sundal has to be stored in refrigerator ,as we have added coconut to it.
* We can use canned chick peas too.
* The same masala , can be used to prepare other millets.


Thursday, September 25, 2014

Pineapple Kesari - பைனாப்பிள் கேசரி - Navarathri special neivedhyam - Step by step

Kesari is usually served as neivedhyam to the goddess ,during navarathri. I just added a twist to it ,by adding pineapple to it. It will taste great, compared to the ordinary kesari. The ratio is very easy to remember. 1:2:3 of Rava: Sugar : water. Yes its that easy. Only point here is , we are replacing 11/2 cup of water with pineapple juice. To get a perfect kesari, two things are important. one is ,the rava has to be cooked completely, if not the kesari will not have a good texture . To achieve that, we should always, cook the rava in low flame. The other point is, use oil in making kesari.  Because it gives a shinier texture, when compared to ghee. Always use ghee at the end, for the kesari to have a good flavour. 
Happy navarathri to all !!!


Preparation time : 10 minutes
Cooking time : 15 minutes
Serves : 4

Ingredients:
!.Pineapple - 1/ 2 cup (chopped)
2.Rava - 1 cup
3.Sugar -2 cups
4.Water - 1 1/2 cups
5.Raisins - few
6.Cashews - few
7.Ghee - 1/4 cup
8.Pineapple juice - 1 1/2 cups
9.Pineapple essence - few drops.
10.Yellow food color - a dash.
11.Oil - 1/2 cup


 Method:
* Take ghee in a pan, heat it. Fry the cashews and keep it aside, when it turns golden brown. Fry the raisins, till they blow like balloons. Dry roast the rava in the same pan. Take care not to black the rava. The rava should give out nice aroma. that is the perfect time to stop the process of roasting. Remove the rava and keep it aside.
* In the same pan, add little ghee and fry the pineapple pieces.  Mix water and pineapple juice together . The ratio can vary according to the quantity of the pineapple juice. For example, if you have 1 cup of juice ,then add 2 cups of water to make it 3 cups. So the ratio of rava to water is 1:3.Now pour the the water + juice to the pan and bring it to boil. Add few drops of yellow food colour to the pan.
* Once the water is at its boiling point, add rava slowly to the pan. Mix it without any lump. Let the rava cook well in medium flame. If not the kesari will have a grainy texture. Add oil little by little.So when the rava is cooked completely, add sugar to the pan and mix. 
* At last, add ghee to the pan and cook. The kesari, should come out like halwa, without sticking to the pan.This is the right consistancy for the kesari.Now add the pineapple essence. Always add the flavourings at the end, if not it will evaporate while cooking. At last garnish it with fried cashews and raisins.Serve the kesari as such or grease a plate with ghee and spread the kesari on it. Use a cookie cutter and cut out the kesari like cookies as I did.


Notes:
* Always roast the rava to have a kesari with fine texture.
* The rava should be cooked well , before adding the sugar.
* Oil gives a shiny texture to the kesari, so always use 1 part of ghee and 2 parts of oil.
* We can also roast and grind the pineapple pieces to a paste, instead of having chunks in the kesari.
* Pineapple essence is optional, if you don't have ,just skip it.
* You can increase or decrease the amount of sugar according to your taste.


Wednesday, September 24, 2014

Sweet Puttu - வெல்லப் புட்டு - Navarathri Special - Step by step

        Sweet puttu is a traditional sweet,prepared during Navarathri . It is prepared with rice flour and jaggery. I have tasted this puttu, once in my friend's house, when I went for golu. Her mom prepared it very well. I was craving to make it for so long. It is quite long process, but its taste worth the work. I was quite impressed with its taste. Try this delicious puttu for the neivedhyam. We can make the puttu using rice cooker. Check my "Ragi puttu " ,which I have prepared using rice cooker. 


Preparation time : 10 minutes
Cooking time : 15 minutes
Serves : 1

Ingredients:
1.Rice flour - 1 cup
2.Grated jaggery - 3/4 cup or less
3.Grated coconut - 1/4 cup
4.Water - as needed
5.Cardamom powder - a big pinch
6.Edible camphor - a pinch (optional)
7.Salt - as needed
8.Ghee - 1 tsp
Add caption
Method:

* We can either use store bought rice flour or can make it at home . Check the link ,to make rice flour at home. Sieve the flour twice. The flour should be lump free ,to get soft puttu. Dry roast the flour in a pan, till it gives out nice aroma. We can also steam the plain flour ,instead of roasting. Let it cool completely.

* Take 1/4 cup of water and mix salt to it. Sprinkle this salt water to the rice flour ,little by little.Don't add water fully  to the flour.

* The flour should be wet ,but not completely. For example, take the flour and press it in your hand, you should be able to form a shape out of it.

* But, when you crush it, it should crumble to fine powder,as shown in picture.

Now, take a damp cloth,transfer the rice flour to it. Tie the cloth well and form a pouch.

Take a idli pan, add water and place a idli plate . Keep the pouch inside .

* Steam it for atleast 10 minutes.We can also steam the rice flour in a rice cooker.

* The rice flour would have cooked. Now take the puttu out and mix it with a spoon or fork. Break the lumps, which are formed ,while steaming. If you can, sieve the puttu again to make it lump free.Cool the flour completely. Now , if you don't like jaggery, we can just add sugar ,cardamom powder and coconut to the puttu and have it as such.


* Now let us make the syrup for rice puttu. Take a pan ,add grated jaggery to it. Add water to the pan,till the jaggery is covered with.

* Boil the jaggery,till it dissolves. Now strain the syrup and remove the impurities. Again  boil the jaggery for another 5 minutes or untill .it reaches soft ball consistancy,  That, is when we drop the syrup on a plate of water,it should be firm. And when we take it out, it should form a ,ball. That is the right consistancy. Below is the jaggery syrup ,with right consistancy. You can check my Adhirasam post to know, how to make jaggery syrup ,with step by step pictures.

* Now add the ,jaggery syrup to the puttu and mix. The syrup should be hot,while mixing. Don't add the syrup fully to the puttu. Taste it, if you feel it so sweet, then reserve the syrup. Mix cardamom powder,ghee and edible camphor. At last, add shredded coconut and serve.

Serve this puttu ,while it is warm.!!!


Notes:
* Sieve the flour twice or thrice,to get a lump free puttu.
* Initially, we can roast the flour or steam it.
* Always the check the consistancy of the flour by pressing it. If you add too much water, then the puttu will have lumps.Add less water to the flour.
* Edible camphor is optional, if you don't have ,just skip it.
* The puttu should be cool, when the hot syrup is added.

Saturday, September 20, 2014

Easy Green plantain chips - வாழைக்காய் சிப்ஸ் - Weekend Special - step by step

              I was on a long vacation to India. It was the most awaited wedding of our family. It was my brother's wedding. He is a Radiologist married to a Gynec. Yeah both of them of interconnected field. The marriage preparations started 2 months back and was a big fat wedding.`The wedding card distribution and shopping were on full swing, when I landed in India on july 9th. One week before, the marriage,we all gathered at our home +Tirunelveli . It was a fun filled 7 days. There will be food prepared in bulk at one side, kids playing at the other side, adults playing cards on the couch. The house was busy all the time.I prepared a big pot full of mutton biriyani for the guests. It was always a pleasure to be surrounded by our kith and kins. I wish I could write a separate post about the wedding. But indeed, I am running out of time. So in a nutshell, India vacation was so hearty.
       Coming to the recipe, green plantain chips is a very easy snack,which can be prepared without any hassle. It works great for small parties. The key in getting crunchy chips, is the thickness of the green plantain. I didn't have any slicer to slice the green plantain. Just used my peeler and sliced it. To my surprise, it came out so thin. The plantain should not have any moisture, while frying, if not it will not turn crispy. These 2 key points will guide to get a crunchy snack. This was in my draft ,just posting it to catch up with u people. So bored to prepare something new and click. Will catch you guys later with more interesting recipes.


Preparation time : 15 mins
Cooking time :      10 mins
Yield : 200 gm (approx)

Ingredients:
1.Green plantain - 1 (big)
2.Salt - as needed
3.Red chilli powder - 1 tsp
4.Oil - for frying


Method:
* Wash the green plantain and peel the skin. Slice the green plantain using a slicer. Since I didn't have slicer, used my peeler to slice the green plantain. Peeler works great and slices the green plantain thinly.
* Take a bowl of water and immerse the green plantain in it. This will prevent the plantain from getting dark colour. 
* Take a hand towel and dry the green plantain on it. This will remove the excess moisture from the green plantain. To avoid the green plantain from getting wet, we can also slice the green plantain directly on hot oil. But we should do it quickly.
* Take a pan of oil and heat it . The oil should sizzle , when we drop the green plantain in the oil.Drop the dried green plantain in batches. Cook the chips, on both the sides, till the sizzling sound stops. 

* Strain the chips on a hand towel or a tissue. let the excess oil get absorbed by the towel.
* Toss some salt,chilli powder and mix. Store in air tight container . I know, it cannot be stored,as we munch it now and then.

Serve with tea and enjoy !!!


Notes:
* Always ,make sure that the green plantain is dry enough to fry. If not the green plantain will not become crispy.
* The oil should be hot ,if not the chips will not be crispy.
* we can also add some pepper powder to spice up the chips instead of chilli powder.
* The chips can stay fresh for 3 to 4 days, if we store them in air tight container.
* Similarly we can prepare potato,tapioca,sweet potato chips.
* Alternativel, we can also bake the chips to decrease the calories.


Wednesday, July 30, 2014

1-2-3 Pancake - Eggless Chocolate Pancake

      This is the most easiest pancake, ever in my life. It doesn't need any beating or whipping, as we do for our pancakes with eggs. The oil replaces egg and gives a gliding effect to the pancakes. With 3 easy steps, we can prepare the pancake in no time.Just add the dry ingredients with the wet and cook. Its that easy. Wven kids can prepare this .

* Check my fluffy pancake recipe here
             * Check the Home made chocolate recipe here. 

Source : here.
Preparation time : 5 minutes
Cooking time : 5 minutes
Yield : 8 approx


Ingredients:
Dry ingredients:
1.Flour - 1 1/4 cups
2.Baking powder - 1 tsp
3.Cocoa - 4 tbsp
4.Salt - 1/4 tsp

Wet ingredients:
1.Oil - 4 1/2 tbsp
2.Vanilla - 2 tsp
3.Milk - 11/2 cups


Method:
Step 1:
* Take the flour,cocoa powder,salt  and baking powder in a pan. Sieve them all together to get a lump free batter. This will also make the baking powder to mix well with the flour.Take milk.oil and vanilla in a separate bowl and mix them well.
Step 2 :
* Add the wet ingredients to the flour mixture .Use a wire whisk to mix the wet ingredients with the dry . The batter should be lump free.
Step 3 :
* Heat a tawa , pour a laddle full of batter on the tawa.Don't spread it . The batter will spread automatically.Within a minute,we will be able to see pores on top of the pancake. Now flip it around and after a minute. remove it from the tawa.

Serve it with butter and drizzle with chocolate syrup.Pancakes tastes good, when they are served hot.


Notes:
* Don't alter the amount of the ingredeints.
* Cook the pancakes, till we see the pores on top, if not it may become rubbery.
* we can alter the flavour with almonds extract.

You might also like

Related Posts Plugin for WordPress, Blogger...